Bought one of the cheep oscilloscopes of eBay.
Decided to make a case for it on my 3D Printer.
3D Prints
I have made Option for: With Battery or Without Battery.
This bit should become easy with practise.
Here are the STL files:
About the Magazine Paper, I cant say exactly which magazine to use, all can
do is describe what I am using.
- 1x Front.stl
- 1x BackWith_Battery.stl or Back_No_Battery.stl
- 4x Button.stl
- 1x Button_R.stl
- 3x Slide.stl
- 4x Washer.stl
If making Case with Battery:
The orientation they should be printed:
Decals
To fix the Decals it is best to watch the video:
It's the sort of magazine that you find on a table in the reception of the
dentist or doctors surgery.
One where all the pages have colour on them and have shiny finish to them.
The magazine that I am currently cutting up, has RichList2019 written at the
top of the pages.
The thickness of the paper is approximately 0.045mm (0.0015")
Video Recap
The first thing to do is design and print a preview of the decals.
Here is the file I have made:
DSO138_Osciloscope_Front_Text.svg
I have exported the file to SVG format so that it can be opened with most
vector graphic applications.
Notes!
- It is best to keep the design less the A5 in size, if you want to do bigger, brake it down into small pieces. the way a laser printer works, it uses static electricity to transfer the toner to the paper. The more paper, the more static electricity it needs.
- As we will be adding a sheet of magazine paper on top of the preview paper we print, this increases the overall thickness of the paper, increasing the amount of static charge needed. We can tell the printer to give more electric charge by altering the setting to heavy satin/matt paper. Some laser printers may give more control and allow increasing the amount of toner.
- Most Laser Printer are designed for printing text, when you start to add large areas of black, some may get patchy.
- One good thing about modern laser printers, is: When you replace the toner, you are also replacing all the other important bits.
Cut the magazine paper to the size of the project.
Then cut this into smaller manageable pieces.
I have not tried it with neat Acetone, I use Nail Polish Remover.
I don't know if any of the other chemicals in the Nail Polish Remover do
anything to aid this process, so if it does not work with other brands
please leave a comment, or if it does work with other brands for that
matter.
2x Nail polish remover.
1x water.
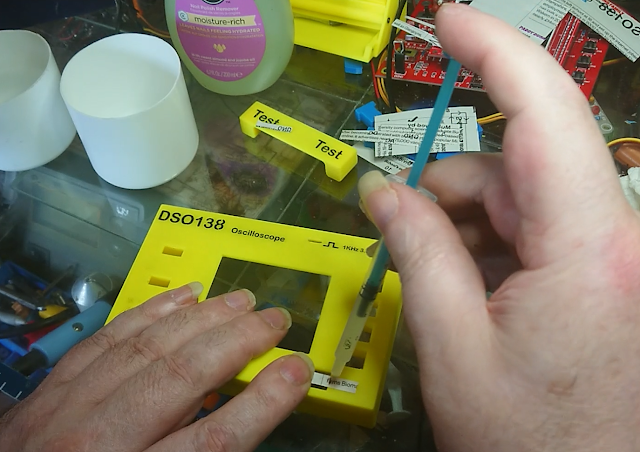
To apply the mix to the decal, I use a small
1mL syringe.
There is a stronger version of this nail polish remover, but using strong
stuff just melts the Decal.
The file I attached also has some "Test" text under my project decals. It is
good practice to do a few test samples before doing your main project.
Its best to watch the video, I have done some screen shots to jog the memory.
- Be sure you have an area of the Magazine that can be held in place.
- Align and hold/fix the Decal in place.
- Apply a few drops of acetone (watered nail polish remover) until the paper becomes opaque/transparent.
- Rub lightly over the top of the Decal, in a direction away from where it is held so that it does not move.
- When the paper is no longer opaque/transparent and feels dry to the touch, lift of the paper.
- The Acetone will have evaporated but the water will remain.
- Press firmly over the Decal with a tissue to dry it off.
- If there are remnants of the original ink from the Magazine Paper, add a little acetone (watered nail polish remover) and wipe it away, trying not to wipe over the Decal.
Obviously refinement and practice will improve the end result.
Change a little to the Main Board
My DSO138 Digital Oscilloscope is a cheap version from China.You can buy the ready assembled, or with some parts needing assembly.
Either case they come with assembly instructions.
One of the instructions is to: Make a small loop of wire and solder it to the
two solder points of "J2".
This is a loop of wire on which you will be able to attach your probe to get a
square wave test signal.
I have placed a standard 2 pin 2.54mm header in stead.
I have also done this at he ground test point.
To get the loop needed I have made two
dupont connectors
with wires attached and plugged them on the headers.
If adding a rechargeable battery to the DSO138, then the white power socket will
need moving to the rear side of the PCB.
Before removing the socket to move it, it is best to mark which pin is the
positive terminal.
Place the sliders and buttons in the relative holes as shown in the photo.
Note, the reset button is slightly different and has a notch which faces up.
Take care while doing this that the slide switches a aligned correctly, do not
force it in.
The wires on the headers may need a little help lining up, I use some narrow
tweezers to guide them through the holes.
Use 4 x M1.7x6mm Self tap screws with washers to hold the board in place.
There is a small amount of lateral movement to align the screen before
tightening the screws.
Note!
It's only plastic, take care tightening the screws.
I usually drive the screw back and forth when fitting screws for the first
time in plastic, driving the screws back and forth creates some friction
(Heat) which softens the plastic.
Choice of two options
If Not fitting a battery, just fit the back piece (No Battery version) in
place with four M1.7x3mm screws.
If fitting a Battery continue on.
Adding a Battery.
Treat Li-Po Batteries Nicely
I just love Li-Po batteries, one of the best things to come out since sliced bread.BUT, you need to treat them nicely.
The Number One rule to a lasting Li-Po battery is: Do NOT let the voltage fall
below 3 volt.
Let them drop below 3 volt and they become bin fodder, dead no use what so
ever.
There are other rules like don't over charge, but my number one is the one
above. Most batteries sold will have protection against this happening, but
there are situations that can arise that may bypass this protection.
I only mention this because I learned the hard way. Ended up with a few dead
batteries.
So when it comes to using a Step Up Buck, I think of the Joule Thief.
So my number two rule when using a Buck and a Li-Po battery is stick a switch
between them.
My box is designed for the
1200mAh Li-Po Battery
like the one shown.
I will be using the
18650 Lithium Battery Charger Board with Protection Module.
The 18650 batteries are a bigger capacity than the battery I am using and as I
will be making this a permanent fixture so to speak I want something I think
will last longer.
This board has the charging circuit on it, but it also has battery protection.
(battery protection to handle a 18650.)
One of my issues I have had with a couple of the 1200mAh batteries is the
MOSFETs have failed. So I am going to remove the ones built into the 1200mAh
batteries, since this board has better ones (hopefully).
Removing the protection circuit inside the battery can be optional.
The manual for the DSO138 Digital Oscilloscope states 8 to 12 volt power input (Not to exceed 12 volt). So I am going for about 10 Volt.
To do this I will be using an
MT3608 Step Up Voltage Buck.
As I have mentioned, I have had these drain Li-Po batteries (bypassing the
protection) so the the on/off switch will go between this and the battery.
The Circuit is quite simple.
I have made a fritzing of
the circuit:
Battery_Circuit.fzz
You will notice there is a diode in the circuit, this is to safeguard
the battery circuit if; Any external power is used.
The battery is charged from the USB on the Charger Board.
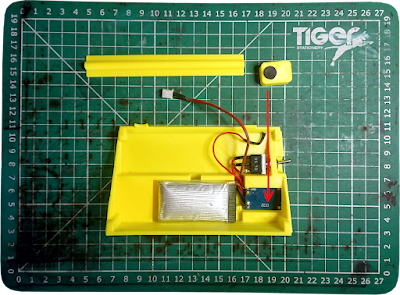
The long retainer is held in place with two M1.7 self tappers in the ends.
Note!
The circuit shows a loose wire to a loop. This loop goes through two small
holes in the top of the back case. This wire comes directly from the
positive side of the battery.
I have added this wire so the voltage of the battery can be checked with
the probe. Remember my first rule about the longevity of Li-Po batteries.
Never let them fall below 3 volt.
The adjustment screw on the MT3608 should be accessible through a slot in
the plastic when all components are fitted.
I have set the voltage to10 volt.
The last thing to do is plug the power into the Oscilloscope and screw the
front and back together, using 4 x M1.7 self tapping screws, two each
side.
I also add 4 small rubber pads to the bottom to finish it off.
To check the battery voltage level, set the oscilloscope to DC and have it
in text mode. Hold the probe on the battery wire on top of the case and read
the Vrms voltage shown.


That's look cool! :)
ReplyDeleteThanks Ben
Delete